How To Use HyperChiller Rapid Iced Coffee Maker
I may get commissions for purchases made through links in this post.

Welcome, my fellow iced coffee lovers! If you are here, you are probably trying to figure out how you can make an iced coffee at home that doesn’t taste watered down from rapidly melting ice. I used to have that problem too… until I found the HyperChiller. Let me tell you why I love it and show you how it works.
Pros:
1) Chills fresh coffee in as little as 3 minutes without watering down the coffee

2) Can be used several times before needing to be taken apart for cleaning
Cons:
1) You’ll need to wait 12 hours before first use and again after any emptying for thorough cleaning.
2) The large cup is made of plastic which can crack in the freezer if you don’t follow the instructions and overfill it
Overall opinion: For $25, the HyperChiller is a must have if you love iced coffee. If it helps you avoid few trips to the coffee shop to get one, it will quickly pay for itself.
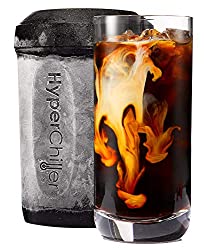
What Is the HyperChiller?
The HyperChiller is the fastest way to chill freshly brewed coffee. Instead of drinking coffee that has been left in the fridge overnight or waiting hours for cold brew recipe to be ready, you can go from brewing to sipping in as little as three minutes. The best part… there is ZERO dilution of your coffee thanks to its patented design.
It works like this. When you pour your freshly brewed hot coffee into the HyperChiller, it flows into the middle where it becomes surrounded by two layers of ice cold stainless steel. Seriously, ice cold. The manufacturer says this cold steel has the chilling power of 30 ice cubes! That’s why it can chill your freshly brewed 6 to 8 oz coffee in three minutes or a 10 to 12 oz coffee in about four minutes, with zero dilution.
How To Use The HyperChiller?
Product Assembly
- Detach the small and large stainless steel cup from the lid by twisting them. Take the small stainless steel cup and fill it with fresh cold water up to the indented mark.
- Twist this small cup back on to the lid.
- Fill the large stainless steel cup with water up to the indented mark. It is very important that you DO NOT go beyond the indented mark. If you do, the HyperChiller could crack in the freezer – remember, water expands when frozen!
- Pour that water from the large cup into the large, plastic HyperChiller cup.
- The large stainless steel cup will be empty. Twist it on to the lid.
- Twist the lid with the two cups attached on to the HyperChiller cup.
- Place in the freezer for a minimum of 12 hours until it is frozen solid.
Iced Coffee Preparation
- If you have a single-serve pod machine like Keurig or Nespresso, you can brew the coffee pod directly on the recessed part of the HyperChiller’s lid. If you make your coffee in a carafe, you can slowly pour it from the carafe on to the lid.
- Once the coffee has flowed through the opening at the bottom of the lid and into the cooling chamber, gently swirl it every few seconds. This keeps the coffee moving. Continue for one minute. If you poured more than 12 oz in, give it an extra 30 seconds.
- Let the HyperChiller rest without swirling for 2 minutes for 6-8 oz coffee and 3 minutes for more than 10 oz of coffee. Add an extra minute if you don’t want to add any iced to your drink at all.
- Once the time has passed, pour the chilled coffee from the large spout on the lid into your cup full of ice.
- To rinse the HyperChiller, pour some clean water through the lid just like you added the coffee. Swirl it around and then pour it out. You may want to repeat this two or three times until the water that comes out is clear. Dry off any condensation from the outside of the plastic cup and lid. Return it to the freezer.
Cleaning
You should rinse your HyperChiller after each use. It’s easy! Just pour clean water through the lid, just like you did with the coffee. Swirl it around a little and then dump the water out. I usually do this two or three times until the water that comes out is pretty clear. Then, just dry off any water and condensation from the outside of the cup and place it back in the freezer. Be sure to keep it upright.
I recommend taking the HyperChiller apart for a deeper clean at least once a week. Take it out of the freezer and let it come to room temperature before disassembling. Separate the pieces and either wash by hand with a sponge and soap or in the top rack of the dishwasher. The inner components are made of stainless steel so don’t use an abrasive tool to clean them.
Where To Buy HyperChiller?
You can find the HyperChiller at several online retailers. As you are shopping, be sure you are getting the newest HC2 model. The older HC1 model has been discontinued, but there may be some still out there, especially on marketplaces. You can buy the HyperChiller at: